Raspberry Pi: Connecting a PIR Switch (motion detector)
Friday 11th August 2017 1:34am

PIR Sensor
Passive Infra Red sensors are commonly used in security systems to detect intruders. All objects whose temperatures are above zero emit infra red radiation.
The sensor is referred to as passive because it does not send out any signal in order to detect movement. It adjusts itself to the infra red signature of the room it’s in and then watches for any changes. Any object moving through the room will disturb the infra red signature, and will cause a change to be noticed by the PIR sensor.
There are three pins on the PIR sensor one requires 5 volts, one is the ground and the other is the sensor (the middle connector) which outputs 3 volts when motion is detected. These can be connected to the GPIO pins on the Raspberry Pi (please see Connecting Hardware to a Raspberry Pi):
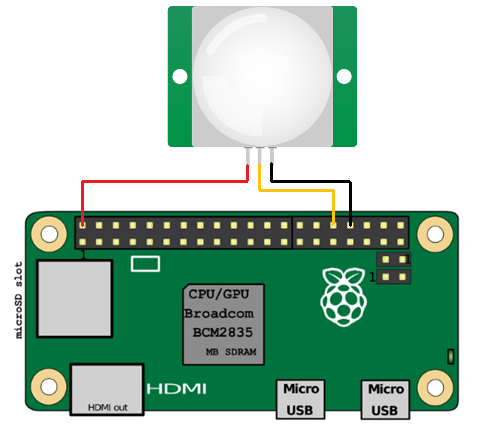
PIR Sensor Wiring
We’re going to use the Python programming language to write some code that will detect movement and print out some text. When movement is detected the PIR motion sensor applies power to its OUT pin, which I have chosen to connect to GPIO pin 32 on the Pi. So in our code we just need to continually check pin 32 to see if it has power or not.
If a pin has power we call it HIGH and if not we call it LOW.
The program is pretty simple. We will first set up the Raspberry Pi GPIO pins to allow us to use pin 32 as an input; it can then detect when the PIR module sends power. We need to continually check the pin for any changes, so a while True loop is used for this. This is an infinite loop so the program will run continuously unless we stop it manually with Ctrl + C.
We then use two Boolean (True or False) variables for the previous and current states of the pin, the previous state being what the current state was the preceding time around the loop. Inside the loop we compare the previous state to the current state to detect when they’re different. We don’t want to keep displaying a message if there has been no change.
The Python GPIO library that comes with Raspbian makes it easy to enable the individual GPIO pins. To test the PIR and wiring open a terminal window and type the following to start the Python interpreter:
sudo python
Next type the following:
import RPi.GPIO as GPIO
import time

PIR_PIN = 32
GPIO.setmode(GPIO.BOARD)
GPIO.setup(PIR_PIN, GPIO.IN, GPIO.PUD_DOWN)
GPIO.setwarnings(False)

previous_state = False
current_state = True

while True:
  time.sleep(0.1)
  previous_state = current_state
  current_state = GPIO.input(PIR_PIN)
  if current_state != previous_state:
    new_state = “HIGH” if current_state else “LOW”
    print(“GPIO pin %s is %s” % (PIR_PIN, new_state))
If you start moving or waving the sensor pin will go HIGH. Keep on waving and it will stay HIGH, and only go back to LOW if you keep still again. If you see the sensor behave like this, then everything is working correctly:
GPIO pin 32 is HIGH
GPIO pin 32 is LOW
GPIO pin 32 is HIGH
Press Ctrl + C when you want to exit.
On the PIR sensor you should see two orange components with sockets that fit a Phillips screwdriver. These are called potentiometers, and they allow you to adjust the sensitivity of the sensor and the detection time. I would suggest setting the sensitivity to max and the time to min, but the choice is yours.
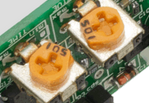
PIR Adjustments
There are a number of useful things we can do with PIR’s for example:
- Change the colour of a Tri-Coloured LED from red to green
- Connect a camera and take a snapshot of the intruder
- Send an Email or Twitter Notification