Raspberry Pi: Connecting an LED
Monday 17th July 2017 6:59pm
Light-Emitting Diodes are semi-conductors which glow when a voltage is applied. LED’s come in many different colours, shapes and sizes:
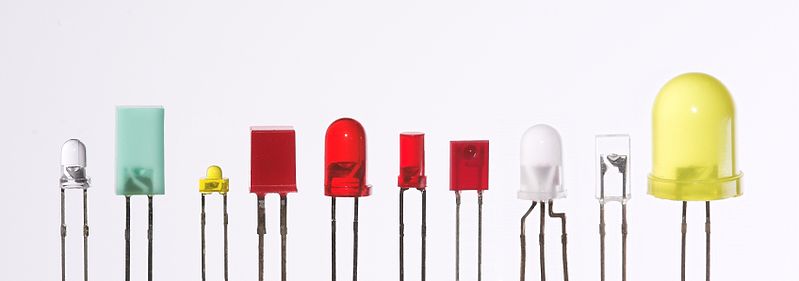
Collection of various LED’s
The LED requires a resistor to be wired in-line to reduce the voltage otherwise the LED will be bright but won’t last as long. I have decided to use a resistor with a value of 220 ohms. This is to be wired to one of the GPIO pins; in this example I have chosen to use pin number 12 (please see Connecting Hardware ):
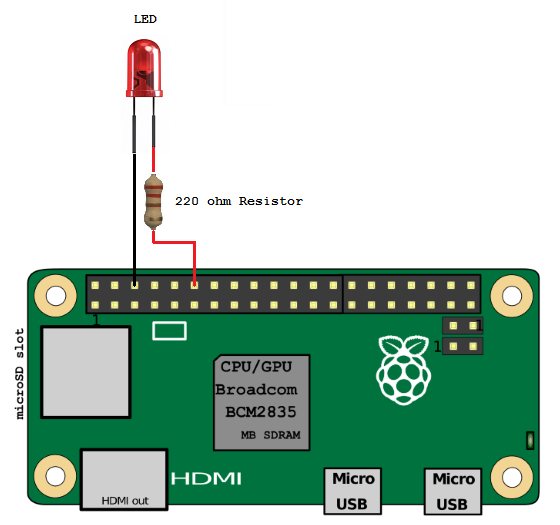
Raspberry Pi LED wiring diagram
To test the LED and wiring open a terminal window and type the following to start the Python interpreter.
sudo python
Next type:
import RPi.GPIO as GPIO
LED_PIN = 12
GPIO.setmode(GPIO.BOARD)
GPIO.setup(LED_PIN, GPIO.OUT)
GPIO.setwarnings(False)
GPIO.output(LED_PIN, GPIO.HIGH)
The LED should now be lit. To turn the LED off again type:
GPIO.output(LED_PIN, GPIO.LOW)
Morse Code
Using the LED to display Morse Code
Now that we have a working LED let’s try something a little more interesting. Let’s try using this LED to flash on and off using Morse code.
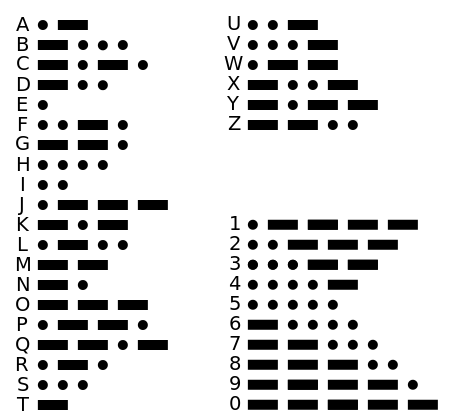
Morse code uses a series of dots and dashes to represent letters and numbers. Letters that are used more frequently have a fewer number of dots or dashes; therefore the letter “E” has one dot and the letter “T” has one dash. Whereas letters like “Q” and “Z” have four dots or dashes.
The timing of Morse code is based on the length of a unit. A dot is one unit and a dash is three units. The space between parts of the same letter is one unit, the space between letters is three units and the space between words is seven units. In the following example the word PARIS would contain a total of fifty units:

Morse code timing
To write a program to implement Morse code we need to import the Python GPIO library, the time library and define the code for each letter. We also want the user to be prompted to type in a message to be converted. Copy the following and save as led_morse_code.py:
#!/usr/bin/env python

# Encode message to Morse code and
# flash the red led.

import RPi.GPIO as GPIO
import time

TURN_ON = 1
TURN_OFF = 0
DOT_LENGTH = 0.2

CODE = {' ': ' ',
        "'": '.----.',
        '(': '-.--.-',
        ')': '-.--.-',
        ',': '--..--',
        '-': '-....-',
        '.': '.-.-.-',
        '/': '-..-.',
        '0': '-----',
        '1': '.----',
        '2': '..---',
        '3': '...--',
        '4': '....-',
        '5': '.....',
        '6': '-....',
        '7': '--...',
        '8': '---..',
        '9': '----.',
        ':': '---...',
        ';': '-.-.-.',
        '?': '..--..',
        'A': '.-',
        'B': '-...',
        'C': '-.-.',
        'D': '-..',
        'E': '.',
        'F': '..-.',
        'G': '--.',
        'H': '....',
        'I': '..',
        'J': '.---',
        'K': '-.-',
        'L': '.-..',
        'M': '--',
        'N': '-.',
        'O': '---',
        'P': '.--.',
        'Q': '--.-',
        'R': '.-.',
        'S': '...',
        'T': '-',
        'U': '..-',
        'V': '...-',
        'W': '.--',
        'X': '-..-',
        'Y': '-.--',
        'Z': '--..',
        '_': '..--.-'}


class MorseCode():

    def __init__(self, led_pin, speaker_pin=None):
        self.LED_PIN = led_pin
        self.SPEAKER_PIN = speaker_pin
        GPIO.setmode(GPIO.BOARD)
        GPIO.setwarnings(False)
        # Setup all the pins
        GPIO.setup(self.LED_PIN, GPIO.OUT)
        if speaker_pin is not None:
            GPIO.setup(self.SPEAKER_PIN, GPIO.OUT)

    def _dot(self):
        GPIO.output(self.LED_PIN, TURN_ON)
        GPIO.output(self.SPEAKER_PIN, TURN_ON)
        time.sleep(DOT_LENGTH)
        GPIO.output(self.LED_PIN, TURN_OFF)
        GPIO.output(self.SPEAKER_PIN, TURN_OFF)
        time.sleep(DOT_LENGTH)

    def _dash(self):
        GPIO.output(self.LED_PIN, TURN_ON)
        if self.SPEAKER_PIN is not None:
            GPIO.output(self.SPEAKER_PIN, TURN_ON)
        time.sleep(DOT_LENGTH * 3)
        GPIO.output(self.LED_PIN, TURN_OFF)
        if self.SPEAKER_PIN is not None:
            GPIO.output(self.SPEAKER_PIN, TURN_OFF)
        time.sleep(DOT_LENGTH)

    def message(self, msg_txt):
        for letter in msg_txt:
            for symbol in CODE[letter.upper()]:
                if symbol == '-':
                    self._dash()
                elif symbol == '.':
                    self._dot()
                else:
                    time.sleep(DOT_LENGTH * 7)

# Check if running stand-alone or imported
if __name__ == '__main__':
    LED_PIN = 12
    SPKR_PIN = 22
    mc = MorseCode(LED_PIN, SPKR_PIN)
    try:
        while True:
            input = raw_input('What message would you like to send? ')
            if input:
                mc.message(input)
            else:
                print '\nQuit'
                quit()
    except KeyboardInterrupt:
        print 'Quit'

    # Tidy up and remaining connections.
    GPIO.cleanup()
When you start the program you will be greeted with “What would you like to send?”. Type in the message you want converting to Morse code and press the enter key. You should now see your message converted to Morse code as a series of flashes that represent dots and dashes.
Using a Tri-Colour LED
There is another type of LED that combines the red, green and blue LED’s into one. These tri-coloured LED’s can be used to not only change the colour from red, green and blue but can mix these colours to create a wide range of colours, in the same way a pixel on your TV screen does.
The red led isn’t as efficient as the green and the blue led’s so to reduce the brightness of the green and blue led’s we have connected a 220 ohm resistor and a 100 ohm resistor.
When all three led’s are lit at the same time the colour produced is closer to white. Tri-coloured LED’s have four legs from left to right these are red, ground, green and blue (the longest leg represents ground). These are to be wired to three of the GPIO pins; in this example I have chosen to use pin numbers 12 (red), 16 (green) and 18 (blue):
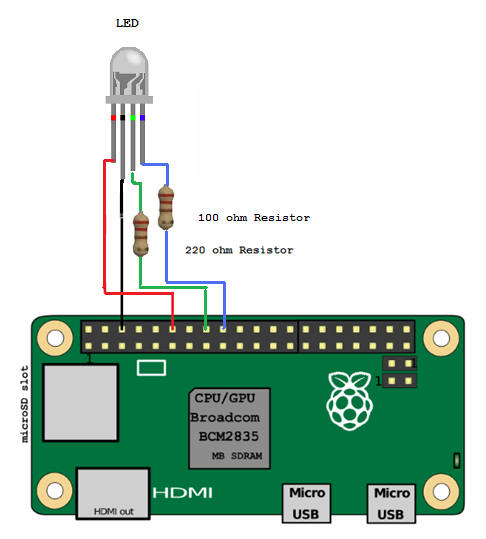
Raspberry Pi RGB LED wiring diagram
Seven Basic Colours
The following script can change the colour of the LED to one of seven different colours by combining the output of red, green and blue LED’s:
led_rgb.py
#!/usr/bin/env python

# Written By: Phantom Raspberry Blower
# Date: 27-05-2016
# Operate an RGB LED. Supply the pin numbers for
# red, green & blue leds and choose from seven
# colours: red, green, blue, yellow, pink, sky and white

import time
import RPi.GPIO as GPIO


class LedRgb():

    def __init__(self, red_pin, green_pin, blue_pin):
        # Define gpio as BOARD numbering (not BCM naming)
        GPIO.setmode(GPIO.BOARD)
        # Disable warnings caused when you set an LED high that is already high
        GPIO.setwarnings(False)
        # Define the pin numbers for red, green and blue led's
        self.led_pins = (red_pin, green_pin, blue_pin)
        # Setup all the pins as outputs
        for col in self.led_pins:
            GPIO.setup(col, GPIO.OUT)

    def _reset(self):
        # Turn all LED's off
        for col in self.led_pins:
            GPIO.output(col, GPIO.LOW)

    def _colour(self, R, G, B):
        # Turn off all colours
        self._reset()
        self.current_rgb = (R, G, B)
        # Turn on selected colours
        if R == 1:
            GPIO.output(self.led_pins[0], GPIO.HIGH)
        if G == 1:
            GPIO.output(self.led_pins[1], GPIO.HIGH)
        if B == 1:
            GPIO.output(self.led_pins[2], GPIO.HIGH)

    def off(self):
        self._reset()

    def on(self):
        self._colour(self.current_rgb[0],
                     self.current_rgb[1],
                     self.current_rgb[2])

    def red(self):
        self._colour(1, 0, 0)

    def green(self):
        self._colour(0, 1, 0)

    def blue(self):
        self._colour(0, 0, 1)

    def yellow(self):
        self._colour(1, 1, 0)

    def pink(self):
        self._colour(1, 0, 1)

    def sky(self):
        self._colour(0, 1, 1)

    def white(self):
        self._colour(1, 1, 1)

    def flash_led(self, count):
        # Set maximum number of flashes to seven
        if count > 7:
            count = 7
            # Flash led for each item in count
            while count > 0:
                self.off()
                time.sleep(0.2)
                self.on()
                time.sleep(0.2)
                count -= 1

    def close(self):
        self._reset()
        GPIO.cleanup()

# Check if running stand-alone or imported
if __name__ == '__main__':
    import led_rgb
    LED_RED_PIN = 12
    LED_GREEN_PIN = 16
    LED_BLUE_PIN = 18
    try:
        led = LedRgb(LED_RED_PIN, LED_GREEN_PIN, LED_BLUE_PIN)
        options = {'red': led.red,
                   'green': led.green,
                   'blue': led.blue,
                   'yellow': led.yellow,
                   'pink': led.pink,
                   'sky': led.sky,
                   'white': led.white,
                   'off': led.off}
        while True:
            # Prompt user for colour selection
            response = raw_input('Enter a colour (red, green, blue, yellow, '
                                 'pink, sky, white or off): ')
            if response in ['exit', 'quit']:
                led.close()
                quit()
            try:
                options[response]()
            except:
                pass
    except KeyboardInterrupt:
        print "\nQuit"

    # Tidy up remaining connections.
    GPIO.cleanup()
All the Colours Inbetween
To get far more than the basic seven colours using PWM (pulse width modulation). By pulsing we can vary the amount of red, green and blue emitted. For example if we want to have more red we can pulse the green and blue whilst leaving the red switched on continuously. The following script will keep changing the colour of the LED to demonstrate:
led_pulse.py
#!/usr/bin/python3
# Controlling an RGB LED with built in PWM.

from time import sleep
import RPi.GPIO as GPIO
import math


class LedPulse():

    def __init__(self, red_led_pin, green_led_pin, blue_led_pin):
        # Pin numbers to match LED legs
        self.LED_RED_PIN = red_led_pin  # Red LED
        self.LED_GREEN_PIN = green_led_pin  # Green LED
        self.LED_BLUE_PIN = blue_led_pin  # Blue LED

        # Use GPIO Board numbering system
        GPIO.setmode(GPIO.BOARD)

        # Setup all the pins
        GPIO.setup(self.LED_RED_PIN, GPIO.OUT)
        GPIO.setup(self.LED_GREEN_PIN, GPIO.OUT)
        GPIO.setup(self.LED_BLUE_PIN, GPIO.OUT)

        # Set PWM Frequency
        self.Freq = 100  # 100 Hz

        # Setup all the colours
        self.RED_LED = GPIO.PWM(self.LED_RED_PIN, self.Freq)  # Pin, frequency
        self.RED_LED.start(0)  # Initial duty cycle of 0, so off
        self.GREEN_LED = GPIO.PWM(self.LED_GREEN_PIN, self.Freq)
        self.GREEN_LED.start(0)
        self.BLUE_LED = GPIO.PWM(self.LED_BLUE_PIN, self.Freq)
        self.BLUE_LED.start(0)

    def colour(self, R, G, B, on_time):
        # Colour brightness range is 0-100
        self.RED_LED.ChangeDutyCycle(R)
        self.GREEN_LED.ChangeDutyCycle(G)
        self.BLUE_LED.ChangeDutyCycle(B)
        sleep(on_time)

        # Turn everything off
        self.RED_LED.ChangeDutyCycle(0)
        self.GREEN_LED.ChangeDutyCycle(0)
        self.BLUE_LED.ChangeDutyCycle(0)

    def PosSinWave(self, amplitude, angle, frequency):
        # Angle in degrees creates a positive sin wave
        # between 0 and amplitude * 2
        return amplitude + (amplitude *
                            math.sin(math.radians(angle) * frequency))

    def __del__(self):
        # Stop all the PWN objects
        self.RED_LED.stop()
        self.GREEN_LED.stop()
        self.BLUE_LED.stop()
        # Tidyup remaining connections
        GPIO.cleanup()

# Check if running stand-alone or imported
if __name__ == '__main__':
    import led_pulse
    LED_RED_PIN = 12
    LED_GREEN_PIN = 16
    LED_BLUE_PIN = 18
    lp = LedPulse(LED_RED_PIN, LED_GREEN_PIN, LED_BLUE_PIN)
    try:
        while True:
            for i in range(0, 720, 5):
                lp.colour(lp.PosSinWave(50, i, 0.5),
                          lp.PosSinWave(50, i, 1),
                          lp.PosSinWave(50, i, 2),
                          0.1)
    except KeyboardInterrupt:
        print '\nQuit'
There are a number of useful things we can do with tri-colour LED’s for example:
- Temperature Sensor
- Represent Day of the Week or Time of the Day
- Email, Facebook and Twitter Notifications
- Motion Detection